Thursday, December 26, 2019

How to get the Purchase Order creation date and time details with Purchase Requisition?

Purchase Requisition is an internal purchasing document and Purchase order is an external purchasing document which will be shared with Vendor to get the ordered materials. We can get the Purchase Order details which are created with reference to respective purchase requisition by using below logic. The PO creation date and time details can be taken by following below two steps

Step 1: Pass Purchase Requisition (BANFN) in EBAN table and get Purchase Order (EBELN). Below screenshots are provided to understand the input data and output data. Transaction code which is used for below screenshots is SE16N

Input Screen is provided below where the Table and Purchase Requisition field are highlighted


Output Screen is provided below where the Purchase order field is highlighted


Step 2: Pass above Purchase Order Number (EBAN-EBELN) as OBJECTID , Application object Change id (CHANGE_IND) = I in CDHDR table and get the PO Creation Date (UDATE) and time (UTIME) as shown below

Input data is provided below by highlighting the Table and input fields


Output data is provided below where the required fields Date and Time are highlighted


We can use this logic when you get the requirement to fetch PO creation date and time for any custom report and smart forms. I hope this document is helpful for you. Thanks for viewing the document. Please provide your valuable feedback and share with your network.

Wednesday, December 11, 2019

What is the career growth and job opportunities in SAP MM module?

SAP MM 
is a Material Management Module, operated by “System Applications and Products,” i.e., SAP. It is created to have an inspection on every small detail related to the things the company is trading with. SAP MM takes care of Procurement & Inventory management at its best. It maintains all aspects of material management (planning, control, etc.). It trades with material management and inventory management.
SAP ERP (Enterprise resource planning) is having SAP MM as the excellent module, especially in Manufacturing & Trading organizations. If you are looking forward to a career with SAP MM, then it has a good scope in delivery firms and manufacturing firms which implement SAP MM module.
This certification gives higher paid jobs in ERP Market in many fields. What’s important for SAP professionals is knowledge of business processes running in material management.
SAP MM
is an ERP system, and it is considered as a great tool to deliver our work in the much more efficient way. Customization of SAP MM as per individual company will be the exceptional help to professionals. Creating POs or Contracts, the creation of reports as per department or cost center wise, vendor management, vendor spend Analysis, budgeting for next financial year all can be done very efficiently with the help of SAP MM.
The work sectors for SAP MM holders can be:
  • SAP MM consultants
  • Purchase Executive
  • SAP MM functional Configurator
  • Sap End User
  • SAP MM Plant Maintenance analyst
  • Material Manager
  • SAP Functional Analyst in MM
  • Team Leader
The above-stated profiles need experience of full lifecycle implantation with good planning and analytical skills. Many companies looking for experts with 2- 4 years experience. SAP MM
is intended to promote the following business processes in an organization.
  • Evaluation of Materials
  • Purchasing
  • Invoice Verification
  • Inventory Management
  • Vendor Master and Material Master Data
  • Consumption-Based Planning
Probabilities of SAP Growth and Salary
SAP MM Trainee Consultants or SAP MM Associates with expected skills are given high salary packages. It is the central logistics area which includes Production Planning, Warehouse management and modules of sales and distribution. For further career growth, you can update to SAP MM /WM or EWM.
Benefits of SAP certification:
Being the most desired certification, IT expert having a certification and expertise in SAP platform are extremely valued. It demands years of experience to obtain expertise. It is a tough certification exam and requires quality training. It is adequate for small companies to big enterprises.
SAP Certification will help you to secure:
  • Higher Salary
  • Quality Job
  • Promotion Possibilities
  • Skill Recognition
  • New Job Possibilities
SAP MM has two levels of SAP Certified Application Associate

Friday, October 11, 2019

How to create a new material movement type in SAP

Assuming I want to create another movement type 9Z2.
Transaction – OMJJ
Menu path – IMG > Material Management > Inventory Management > Movement types > Copy, Change Movement types

To copy a movement type, select the field “Movement type” from the popup and choose Continue.

The dialog box Define work area appears.
In the dialog box “Define work area”, enter the movement type you want to copy in the “From:” field.
In the “To:” field, enter the name of the new movement type you want to create (the new MvT should either beginning with 9 or Z).

On “Change view movement type: overview” screen, select movement type to copy and click on “Copy as…” icon (F6):

Give the name and press “Enter” key:

Click on “Copy All” when a pop up window appears which says “the entry to be copied has dependant entries” and you should be able to see an information message after successful copy.

Check all views for the new movement type and, if necessary, change the control indicators. Please note that some views have a detail screen:
  • Short texts – here you can maintain transaction short text for different languages.
  • Allowed transactions – a list of transactions can be maintained which are allowed to post this movement type.
  • Help texts – this text will be visible to the user when he presses F1 for help. It can be maintained in different languages.
  • Field Selection – Over here required and optional entry fields can be maintained. The fields are grouped into logical groups like Account Assignment, Material Management etc. Based on the group, a desired field can be selected. This field can then be suppressed, made a required entry or an optional entry based on the radio button selection.
  • Update Control – This is applicable is Warehouse Management is active. The settings in this tab provide the reference movement type for Warehouse Management.
  • Account Grouping – In this screen you can maintain the account modification keys. The account modification key is to differentiate account determination for the goods movement. The values of this key are SAP predefined and cannot be changed (T030).
  • Reversal / follow on movement – Over here you can maintain the movement type for reversal movement. By Indicator type of posting in this screen, the system decides whether the quantity adopted from the reference document (which is getting reversed based on this movement type) may be changed or not.
  • Reason for movement – Over here you can define which reasons are allowed while posting the mentioned movement type. This field is usually used to differentiate the different scenarios (for reporting purpose) in which the said movement type can be used. The movement type configuration for Field Selection can be used to determine if this is a mandatory or an optional field while posting the document.
  • Deactivate QM inspection – By this setting you can configure the instances when this movement type is used and Quality Management is not active. As a result no inspection lots will be created for an inspection process.
  • LIS statistics group – Over here different statistic groups can be maintained for different possibilities of this movement type.
Now we can save it.

Thursday, October 10, 2019

Create a Quality Stock directly using 501 and 502 mvt type

1) Activate 05 inspection Type in the qM view of the material master

Check the indicator "Post to Insp. Stock " in Quality Management tab in Material master

2) Do the GR with Mvt type 501


3) Inspection lot is created


Tuesday, October 8, 2019

Analytical apps – How To create and transport KPIs, Evaluations and Tiles

Hi S/4Hana community,
This time I am going to talk about KPIs, evaluation and tiles.
It’s been very hard to me to find some good information about how to create Tiles for the existing analytical apps that shows a different currency, time frame, etc than the one that comes by deafult with a vanilla activation.
Because of this, below you will find a very illustrative explanation.
The process is composed of five steps:
1) Create a Catalog
2) Create a Z KPI copy of one of the standard
3) Create the evaluations you want
4) Create a tile for the evaluation
5) How to transport everything to another system (new feature!)
About point 1, I am not going to write much. You can find several post about how to create a Catalog. You are going to use this catalog in step 4.
2) For creating a copy of an standard KPI, you have to do the following:


Note: Package, Workbench and Customizing Request resides in the Backend Server.


3) Create the evaluations you want


4) Create a tile for the evaluation


Note: The tile is going to be created in the transport request that you have assigned in the launchpad designer.
The final result is the next (original app in EUR at the left, new tile in USD at the right):

5) How to Transport averything:


This is it.
Hope it’s useful for you.

Tuesday, September 24, 2019

System should not allow to delete PO line Item after GR/IR

Standard SAP will not allowed the PO to be deleted once it was GR done. The controlled is on the attributes of message to set as "E"
Message no. 06115
But if invoiced takes place, the is the point that PO can be deleted.
You have to do have a Enhancement using MM06E005, insert you logic here to check PO history tables like EKBE, then check if invoice " Q" (BEWTP) exist, the PO cannot be deleted once the user delete the PO line and SAVE it. Ask you developer to help you on the following coding.
Use MM06E005 and EXIT_SAPMM06E_012
IF SY-TCODE = 'ME22N'.
IF sy-ucomm = 'MESAVE' OR SY-UCOMM = 'YES'..
LOOP AT TEKPO.
IF TEKPO-LOEKZ = 'L'.
SELECT SINGLE BELNR FROM EKBE INTO BELNR1 WHERE EBELN = TEKPO-EBELN AND EBELP = TEKPO-EBELP AND BEWTP = 'E'.
IF SY-SUBRC = 0.
SELECT SINGLE BELNR FROM EKBE INTO BELNR2 WHERE EBELN = TEKPO-EBELN AND EBELP = TEKPO-EBELP AND BEWTP = 'Q'.
IF SY-SUBRC = 0.

Thursday, September 19, 2019

How to set up an easy Material Master creation Workflow


This Blog describes how to create a very simple SAP Business Workflow with a single decision step that can be used for Duet or Alloy.
The Workflow will be triggered by the creation of a new material in the ERP Backend (transaction MM01). The sample workflow just consists of a single decision step which is to approve or reject the new material. The work item will be visible in the Business Workplace.
In this easy example we do not focus on a complex agent determination – therefore the creator of the material also receives the work item himself (which is fine for this example – but may not be the case in a real environment).
In order to enhance the work item with some Material specific values we create a new Business Object (inherited from the standard Material Business Object) with some new attributes.
As a first step we create a new Business Object Subtype, inherited from the Material Master Object Type. Then we define the Event Linkage, and finally we create a new Workflow in the workflow builder that uses the event to initiate the workflow.

1. Create a new Business Object Subtype
Start Transaction SWO1 to launch the Business Object Builder. Enter Standard Business Object Type BUS1001006 (Standard Material). From the menu choose Object Type –> Inheritance –> Create Subtype, and provide the attributes required in the popup-menu:
.
The subtype has inherited all Attributes, Methods etc. from the superior object. In order to create own attributes place the cursor on “Attributes” and press the create button. As we want to create attributes that are coming from the Material Master table MARA, we select “Yes” in the “Create with ABAP Dictionary field proposals” dialog. Enter “MARA” as table name and scroll down to the fields “Size / Dimensions“, “EAN/UPC” and “EAN Category” and select them. Press Enter to close the dialog. For each newly selected line there will be a popup with the attribute properties. You can confirm the default values.
.
Set Object Type to “Implemented” by selecting Edit –> Change Release Status –> Object Type –> To Implemented. Generate the Object Type by pressing the generate button, or by CTRL+F3.
2. Define Event Linkage
Call Transaction SWEC to define the Event Linkage. Otherwise the event on the new Business Object Subtype won’t be executed and thus no consumer will be called. Press “New Entries” button, and specify the attributes as follows:
.
Press Save.
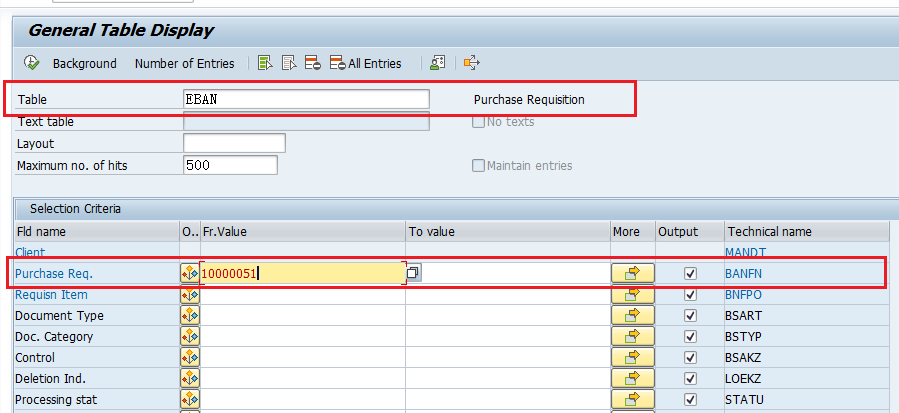
Ensure that the event trace (Transaction SWELS is turned on). If you now create a Material via Transaction MM01, you can see the event in the event log (Transaction SWEL):
.
3. Define Sample Workflow
Start the Workflow Builder with transaction SWDD and press the Create button. Switch to the Workflow Container view in the lower left corner. Double click to create a new container element. Perform this step for the following attributes. Define all of them with “ABAP Dictionary Reference“.
 Element  Name  Short Description  Structure  Field
 ZMaterialNumber  ZMaterialNumber  Material Number   MARA  MATNR 
 ZMaterialText  ZMaterialText   Material Text   MAKT   MAKTX 
 ZMaterialSizeDimensions  ZMaterialSizeDimensions  Material Size Dimensions   MARA   GROES 
 ZMaterialEAN   ZMaterialEAN   Material EAN   MARA   EAN11 
 ZMaterialEANCategory   ZMaterialEANCategory   Material EAN Category   MARA   NUMTP 


.
Switch back to the “Step Types that can be inserted” view in the lower left corner. Drag & Drop a “User Decision” step from the toolbox into the Graphical Model:
.
Provide a Title with placeholders to immediately see the attributes, set “&_WF_INITIATOR&” as the Agent for execution and specify the Approve and Reject decisions:
.
Go to the 2nd tab strip (Details) and de-activate “Advance with dialog“. Click the green check-mark button in the upper left corner of the Task screen to transfer the definition to the graphics. Press the “Hat” button or CTRL+F8 to access the basic data. Specify an abbreviation and a description. Navigate to the “Start Events” tab strip, specify the above created Object Type as triggering event and select “CREATED” as the triggering event. Save the Workflow.
Click on the button in the first column to activate the triggering event. Click on the second Button in the table to define the binding. Define the mapping for all 5 attributes via Drag&Drop:
.
Confirm the dialog, press Save and back to go to the initial screen. Press the “Generate and activate runtime version” button or CTRL+F3.
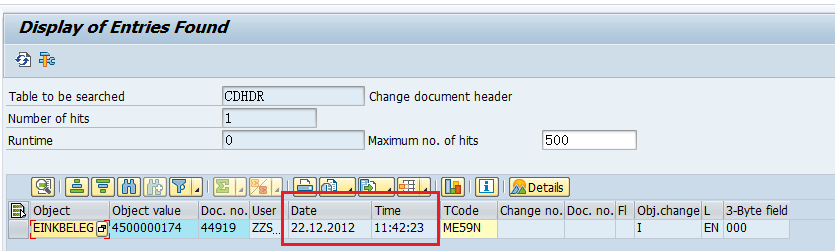
Create another material to verify settings. Go to the Event log (Transaction SWEL), and you should see the triggered event, which has been consumed by the new workflow:
.
Go to the Business Workplace and you should also see the new work item:
.
Via the Workflow log you can navigate into the container to verify if the Z-attributes have been handed over correctly:
.
That’s it.

Wednesday, September 4, 2019

Movement 311 Function module BAPI BAPI_GOODSMVT_CREATE

Pstng_Date : system date
Doc_Date: System Date
(is anything required to fill in the column?)
GOODSMVT_CODE: 04
GOODSMVT_ITEM :
Material : Material-A
Plant: 1000
Stg_Loc: ST01
Batch: BATCH01
Move Type: 311
ENTRY_Qty: 175
Entry UOM: EA
Entry UOM_ISO: EA
Move_Mat : Material-A
Move_Plant: 1000
Move stlock: ST02
Move Batch: BATCH01


BAPI_GOODSMVT_CREATE

BAPI_TRANSACTION_COMMIT


Thursday, August 29, 2019

Auto mail send at Goods Receipt in SAP

In this post, i am going to explain of setting up auto mail at goods receipt functionality in SAP Materials Management.
Pr-requisite
The basic knowledge of SAP Materials Management (MM) is required to make use of this document in real practice.
 Overview:
 The purchaser or department head or indent-er can get the mail when their material received at warehouse.All the details of the goods receipt can be captured in the mail message.
Purpose of this document
  The goods receipt mail message functionality and the IMG settings required in SAP MM. The details that are relevant for the goods receipt can be captured in the mail message. Hence the buyer is aware of all the information with regard to goods receipt. 

IMG setting:
SAPIMG >Materials Management > Inventory Management and Physical Inventory >Output Determination >Maintain Output Types

The settings for Message type MLGR must be carried out as shown below:


Make sure the program and FORM routine are mentioned as below.


The transmission medium should be Simple Mail, and the partner function is Mail partner.


Make sure that the FORM routine TEXT_PARAMETER is maintained in the Mail tab.


The mail text can be maintained as given below so that the mail recipient gets all the details of the goods receipt.


Maintain Output Determination Procedure:
SAPIMG >Materials Management > Inventory Management and Physical Inventory >Output Determination > Maintain Output Determination Procedures
SAPIMG > Materials Management > Inventory Management and Physical Inventory > Output Determination > Maintain Conditions

Maintain the condition record for the message type MLGR.


If there is a requirement for an express message, the following can be maintained in the communication method:


GR Message Process
1) Purchase order creation – transaction code ME21n
The GR message checkbox has to be checked in the Purchase order.


2) Goods receipt against purchase order – transaction MB01 or MIGO.
Goods receipt is done using MB01 to illustrate the automatic creation of the message in the material document.


The message is created while doing GR in MB01.


4) User navigates to the inbox to check the message. The body of the message shows the details like material, quantity, purchase order number, and quantity delivered.